-
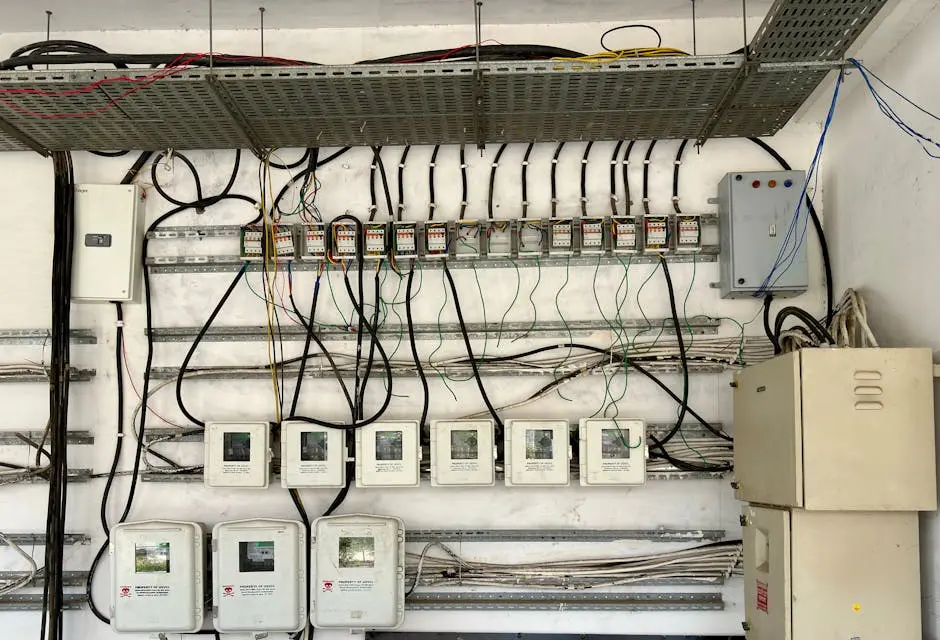
Cable Management
-
Terminals
-
Wire & Cable
-
Wire Connectors
-
Heat Shrink
-
Switches

Terminal connectors might seem like small, insignificant components in the grand scheme of electrical systems, yet they play a crucial role in ensuring safety, efficiency, and reliability. Whether you’re an engineer, electrician, or just curious about how these connectors contribute to modern electrical systems, this exploration will guide you through their varied applications and benefits.
At their core, terminal connectors are devices used to join two or more electrical circuits. They ensure that electrical connections are secure and stable, preventing faults and potential safety hazards. Let’s break down what makes terminal connectors essential components in electrical systems.
Terminal connectors come in various shapes and sizes, designed to suit specific functions and environments. Their fundamental role is to provide a point where electrical circuits can connect safely, creating a path for electrical flow. An important factor to consider is their capacity to handle varying currents, which makes choosing the right type of connector crucial for the system’s overall reliability.
From residential to industrial applications, terminal connectors are present across numerous domains. Their significance is not only in the role they play within broader systems but also in how they make maintenance and system modifications easier. Given their importance, the design and selection process involves careful consideration of several factors such as environmental conditions and electrical requirements.
There are several types of terminal connectors, each designed for specific applications. Depending on the requirements, you might come across screw terminals, spade terminals, or ring terminals, among others. Understanding these types helps us appreciate their unique characteristics and uses.
Screw terminals are commonly used due to their reliability in securing wires. They are particularly useful in environments where vibrations occur, as the screws ensure a stable connection. On the other hand, spade terminals are often employed in automotive and household applications because they allow for quick and easy connections. Moreover, ring terminals provide a secure connection that prevents accidental disconnection, making them popular in industrial settings.
Each type comes with its advantages and limitations. For instance, while screw terminals offer strong connections, they can be more time-consuming to install. Similarly, ring terminals might require more space but are ideal for environments where connection stability is non-negotiable. This diversity allows professionals to choose the best connector based on the specific demands of their projects, ensuring efficiency and safety.
One of the primary roles of terminal connectors in electrical systems is to enhance safety and operational efficiency. By ensuring stable connections, they minimize the risk of short circuits and other electrical malfunctions, which can lead to equipment damage or personal injury.
Beyond preventing malfunctions, terminal connectors also promote efficient energy flow. This efficiency reduces energy waste and can significantly lower operational costs, especially in large-scale operations. For this reason, both the durability and conductivity of material are key considerations in their manufacturing, influencing factors such as metal coatings and base materials used.
In safety-critical systems, the choice of terminal connector can dictate the margin between reliable operation and potential hazards. Selecting the right connectors ensures that connections hold under stress while also conforming to strict safety standards. This is particularly important in industries with stringent regulatory environments, where poorly chosen components could lead to compliance issues or worse, safety incidents.
As technology advances, so too does the design and functionality of terminal connectors. Innovations aim to meet the growing demand for more efficient, reliable, and environmentally friendly electrical connections. Exploring these future trends can give us insight into what lies ahead.
Modern terminal connectors are increasingly incorporating smart technology, enhancing their ability to monitor performance and diagnose issues automatically. This can drastically reduce maintenance times and improve system uptime. Some connectors now even offer integrated sensor technology, providing real-time data on connection status and environment conditions.
Sustainability is also becoming a driving factor in connector development. Manufacturers are now focusing on recyclable materials and energy-efficient production processes. As more industries strive to reduce their carbon footprint, these eco-friendly solutions are expected to become industry standards. Future innovations will likely focus on making connectors not just smarter and more reliable, but also more sustainable.
In conclusion, terminal connectors are far more than just functional components within electrical systems. Their versatility and ability to adapt to different use cases make them indispensable in both everyday and specialized applications. As technology and design evolve, so too will the role of terminal connectors, continuing to meet the challenges of our modern electrical demands.

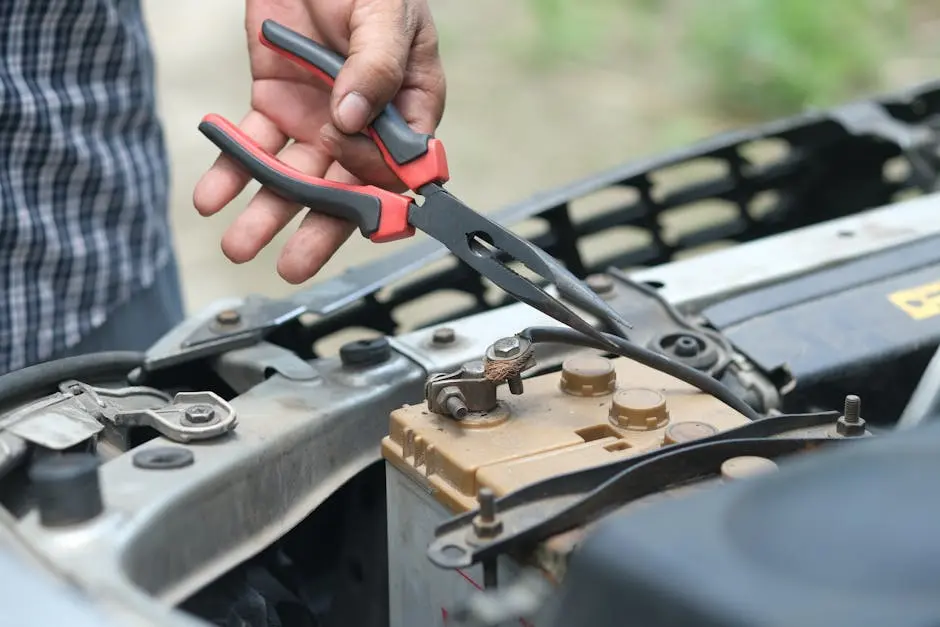
Ensuring your vehicle’s battery cables are in good condition is crucial for maintaining a reliable electrical system. Over time, battery cables can wear out, leading to performance issues or even a failure to start. In this guide, we’ll explore some simple ways to determine if your battery cables need replacing.
Start by inspecting your battery cables for any obvious signs of damage such as fraying, cracking, or excessive wear. This kind of damage can interrupt the flow of electricity, causing performance issues.
If the cables appear to be damaged, it is crucial to address this issue immediately to ensure continued reliability of your vehicle’s electrical system. Damaged cables can result in engine start failures, leaving you stranded.
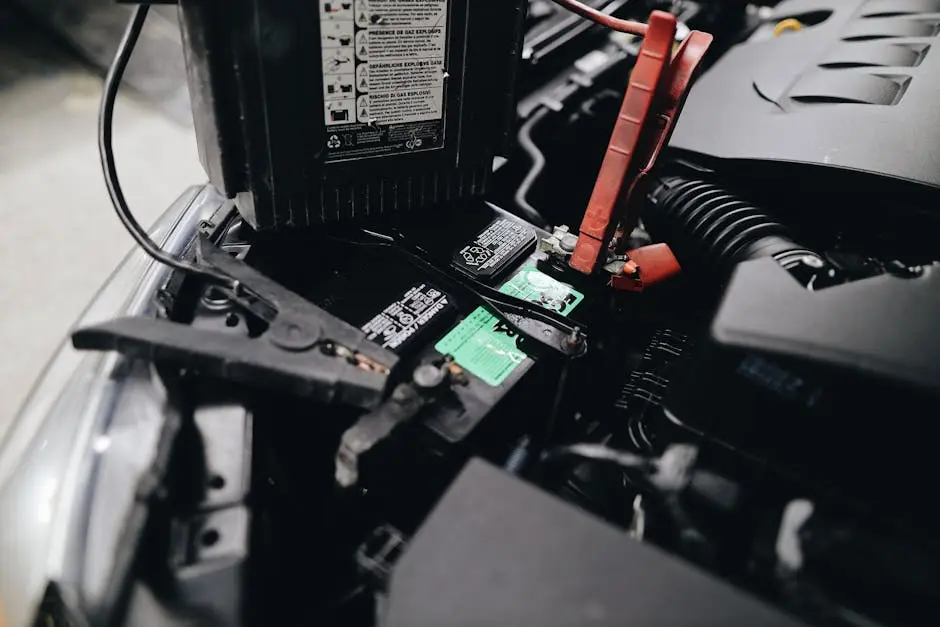
Corrosion, often seen as a white or bluish powdery substance around the battery terminals or cable ends, can interfere with electrical connectivity. Regular cleaning can help, but if the corrosion is extensive, replacement might be necessary.
To clean the corrosion, a simple mixture of baking soda and water can be applied around the terminals. However, if the corrosion persists and spreads extensively, it may be time for preventive maintenance measures.
Healthy battery cables should be flexible. Gently bend the cables to see if they are supple or if they feel stiff and brittle. Stiff or brittle cables are more likely to crack and should be replaced.
Flexible cables allow for better current flow, decreasing the likelihood of battery startup issues. If you notice any portions of the cable feeling fragile, it could be a sign of wear and aging, so catching these early will avoid inconvenient vehicle breakdowns.
Ensure that the connections between the battery cables and the battery terminals are tight and secure. Loose connections can lead to intermittent electrical problems and should be tightened or replaced if necessary.
If you’re experiencing unexpected flickering lights or issues starting the vehicle, looseness in connections might be the culprit. Regularly checking and securing these connections can significantly improve the electrical flow efficiency, minimizing the risk of failures.
Performing a voltage drop test can help determine if there’s too much resistance in the cable, which indicates it’s not conducting electricity efficiently. If the test reveals high resistance, it may be time for a replacement.
A voltage drop test is straightforward and can be done with a multimeter. When resistance levels exceed the norm, the inefficiency results in power loss, impacting the overall performance of your vehicle’s electrical system. Learn more about the significance of this diagnostic test.
By regularly checking your battery cables for signs of wear and performing routine maintenance, you can prevent unexpected electrical issues and ensure your vehicle runs smoothly. Remember, if you’re ever in doubt about the condition of your cables, consulting with a professional is always a smart choice. For all your electrical needs, visit our homepage and explore our offerings.

Installing battery cables might seem straightforward, but there are several common mistakes that can lead to big problems if not addressed. In this guide, we’ll explore these pitfalls and how to avoid them, ensuring your battery setup is safe and efficient.
Selecting the correct cable size is crucial. Using a cable that is too thin can cause overheating, while one that is too thick can be unnecessarily costly and hard to work with. It’s not only about immediate efficiency but also about long-term safety. Incorrect cable sizes can lead to energy loss which affects your battery’s overall performance. Understanding the importance of cable size can help you choose wisely, ensuring optimal power flow and reducing the risk of short circuits.
Cable length affects the resistance. Longer cables increase resistance, which can lead to power loss. Always measure carefully to ensure the cable isn’t too long or too short. Remember, the right length ensures minimal resistance and helps maintain a consistent voltage to your device. Consider the physical layout too—plan your setup to minimize unnecessary bends or loops, as these add unwanted length and potential points of failure. This consideration is especially important in environments where space is at a premium and efficiency is key.
Loose connections can lead to arcing and power failure. Ensure all connections are tight and secure to maintain a stable power supply. Regular inspections of the terminals and connections can prevent unexpected outages. Use locking mechanisms or double-check connectors to confirm they are fully engaged. Properly securing connections not only prolongs the lifespan of your battery system but also enhances safety by preventing dangerous heat buildup from poor contacts.
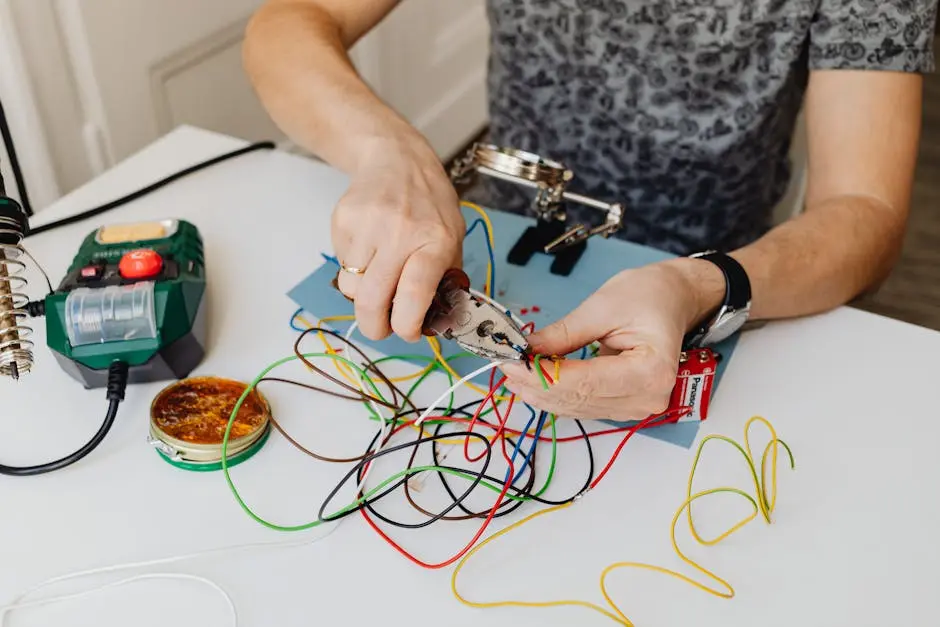
Using improper tools can damage the cables or terminals. Invest in quality tools like wire strippers and crimpers to get the job done right. Quality tools ensure reliability in your connections and help maintain the integrity of the wire and connectors. Improperly stripped wires can lead to fraying or breakage, inefficient connectivity, and unsafe conditions. Remember, investing in the right tools can save you money and time over the long term while ensuring your setup is up to standard.
Insulation is key to protecting cables from environmental damage. Damaged or inadequate insulation can lead to short circuits. Besides the visible wear and tear, it is essential to ensure that the insulation material is suitable for the environment the cables will be exposed to. Heat, cold, moisture, or chemical exposure can all weaken insulation over time, making cable failure more likely. Keep an eye on this, especially if conditions around your setup change with seasons or usage patterns.
Good grounding is essential for safety and performance. Ensure that cables are grounded according to manufacturers’ specifications. Proper grounding helps protect both the circuit and the user from faults that could lead to shock or fire hazards. It also aids in maintaining system stability by minimizing interference from electromagnetic fields. Always follow the guidelines provided for specific battery setups and consider seeking professional advice if unsure about the grounding process.
Testing ensures everything is working correctly. Skipping this step can mean missing potential issues that could cause failures later. Conducting post-installation tests using a multimeter or other diagnostic tools can quickly reveal whether connections are secure and circuits are complete. Regular testing also helps track performance over time, allowing you to catch degradation before it becomes a significant problem. Make it a habit to test after any maintenance or significant environmental changes to keep your system reliable.
Corrosion can impede electric flow and cause efficiency issues. Always clean terminal connections before installation. Regular cleaning of terminals with appropriate solutions helps prevent corrosion buildup, which can otherwise lead to poor conductivity. Apply anti-corrosion sprays or petroleum jelly as a preventive measure after cleaning. Corroded terminals can also lead to overheating due to increased resistance, so maintaining them is crucial for both efficiency and safety.
Connecting cables to the wrong terminals can cause serious damage. Double-check that you are connecting positive and negative cables correctly. Mismatched connections can cause immediate device failure or require costly repairs. Always follow color-coding or labeling standards to minimize errors, especially during initial installation or maintenance. Confirm connections with a testing device if you’re unsure and follow manufacturer instructions closely to ensure accurate setup.
Manufacturers provide specific instructions for a reason. Ignoring these can lead to improper installation and void warranties. Always read through the guidelines and make sure to adhere to them—this not only safeguards your equipment but also ensures optimal performance and safety. Manufacturer instructions often include setup tips, safe operation procedures, and troubleshooting advice that are vital for proper maintenance and operation of your battery system.
Cables need some flexibility to accommodate movement and prevent stress. Rigid cables may crack under pressure and cause failures. Consider the environment and any potential physical adjustments that may occur around the battery arrangement. Flexible cables adapt better to movement and vibrations, especially in mobile or transport setups. Employ flexible connectors where needed and regularly inspect for signs of stress or wear at bends and joints.
Different types of cables are used for different applications. Make sure the cable you use is suitable for your specific battery setup. Consult with experts or resources to identify the right type of cable for your specific needs, whether you are dealing with high temperatures, heavy current loads, or exposure to the elements. Installation projects often have specific requirements that standard cables might not meet; understanding these requirements can make significant long-term differences.
Cables should be routed away from sharp edges and heat sources. Poor routing can lead to damage and reduce the lifespan of the cables. Plan your route carefully before installation, ensuring cables remain clear of interference and potential physical damage. Utilize cable ties and proper clips to secure cables along the chosen path, reducing the chance of them coming into contact with potentially harmful objects or areas. Thoughtful routing can avoid most physical damages and save costs related to premature replacements.
Routine inspections can catch wear and tear before issues arise. Schedule regular checks to ensure everything is in good condition. This proactive approach helps identify potential issues such as loosening connections, corroded parts, or insulation decay. Regular maintenance aligned with inspection results can immensely extend the lifetime and reliability of your battery setup. In devices that work under tough conditions, this step is even more crucial to prolong not only cable life but also device safety and efficiency.
Always follow safety protocols to protect yourself from electric shock or other injuries. Wear appropriate personal protective equipment at all times. Safety should be your top priority in any electrical project, requiring more than just protective gear – it’s about adopting an attitude of caution and mindfulness throughout the process. Keep your workspace organized and free of distractions to prevent accidents, and don’t hesitate to consult resources or professionals when tackling unfamiliar tasks.

Using ring terminals might seem straightforward, but there are common mistakes that can compromise your work. Whether you’re a DIY enthusiast or an experienced professional, understanding these pitfalls can save you a lot of time and trouble.
Selecting the correct ring terminal size is crucial for ensuring a secure fit. Using a terminal that’s too large or too small can result in poor connections and potential hazards.
Finding the right fit is like finding the perfect shoe. If it’s too tight, you risk damaging the wire, while a loose fit can lead you to unreliable connections. Always refer to the standard sizing charts to determine the best size for your project. When in doubt, seek guidance from experienced technicians to ensure a flawless installation.
Crimping might seem easy, but using the wrong technique can lead to a weak connection. Make sure you’re using the right tools and applying the correct pressure for an effective crimp.
It’s not just about pressure; it’s about precision. Incorrect crimping might appear sufficient, but the results can be catastrophic. The durability of your connections often depends on a well-executed crimp. Professionals suggest investing in quality crimping tools that ensure uniformity and reliability throughout the job. Remember, a solid crimp today can prevent a failure tomorrow.
Stripping too much or too little insulation from the wire can affect the terminal’s performance. Follow precise guidelines to ensure only the necessary amount of wire is exposed.
Stripping wires requires a careful touch. Expose too much, and you’ll risk shorts and exposure to elements; too little, and the connection won’t hold. The key is precision. Tools like automatic wire strippers can offer assistance in achieving predictable and repeatable results, ensuring your terminal connections remain impeccable.
Matching the ring terminal to the appropriate wire gauge is essential. Mismatched sizes can lead to inefficient connections and possible failures.
Wire gauge isn’t just a number; it’s your assurance for safety and performance. Incompatible gauges can incur higher resistance, causing overheating and eventual failure of the system. Always test the compatibility using an amperage capacity chart and keep a variety of terminals on hand to match different tasks. This way, you’ll have flexibility and adaptability at your fingertips.
Environmental conditions such as humidity and temperature can impact the performance of ring terminals. Choose materials that withstand specific environmental conditions to maintain connection integrity.
Don’t let environmental conditions sneak up on you. Whether it’s the sweltering heat or damp cold, your materials should be equipped to handle the challenge. Consider the use of corrosion-resistant terminals for damp environments and insulated variants for outdoor setups. This foresight can extend the lifespan and reliability of your connections.
The right tools are critical for optimal ring terminal application. Inadequate or worn-out tools can hinder your ability to achieve a secure connection.
Tool quality directly correlates with connection quality. A dull cutter or misaligned crimper can spell disaster for your projects. Regular maintenance of your tools can mitigate these risks. Consider upgrading to industry-standard equipment, ensuring each terminal is installed with the precision it deserves.
A quick inspection after installation can catch mistakes. Check for loose connections or improperly seated terminals to ensure everything is in place.
Inspection isn’t just a formality; it’s a necessity. Look for subtle signs of wear or misalignment that might signal trouble. Post-inspection, don’t hesitate to execute a small stress test that verifies the soundness of your connections. This verification step can save costly repairs down the line.
Consider the electrical load requirements of your project. Using undersized terminals for high load applications can lead to overheating and failures.
Unknowingly underrating your load requirements can quickly escalate to dangerous levels. Consulting with an expert on ampacity tables can help ascertain the load capacity specific to your condition. This prevents potential failures and maximizes the reliability of your project.
Protection is vital for long-term performance. Use heat shrink tubing and terminal covers to protect against corrosion and physical damage.
The final touch of a project often lies in its protective measures. Heat shrink tubing or specialized wraps enhance protection against environmental threats. Ensuring these steps post-installation allows for a prolonged terminal life, keeping your connections as robust as the day they were made.